
Chardon, Ohio, United States
Tom Fazio (1998)
7,215 Yards, Par-72
Rating/Slope: 75.8/138
My Quick Review: Once rated among the top-60 courses in the country by Golf Digest, but I struggle to see it as even a Modern top-100.
Routing

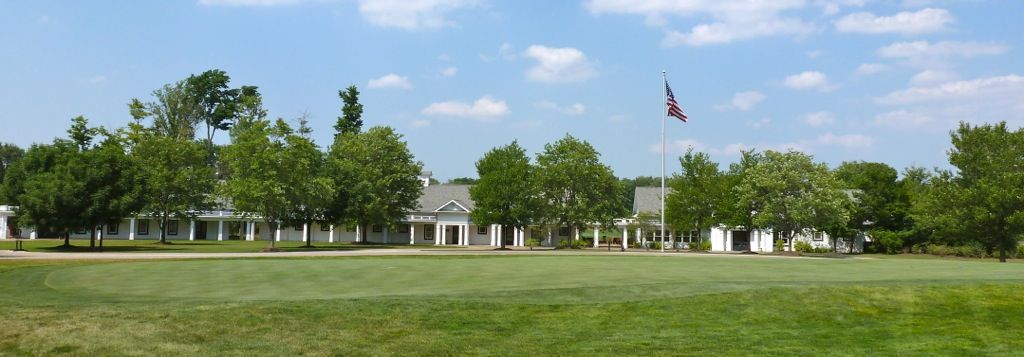
Clubhouse
Hole 1: Par 4, 360 Yards -- A solid starting hole. Though there is plenty of room between the flanking bunkers, the hog's back fairway will serve to kick mediocre tee shots into the rough. A semi-blind approach for those unable to crest the hill 250 yards from the tee.


Hole 2: Par 4, 383 Yards -- There is little room to miss here with a waste area right and trees/hazard to the left. The clever golfer will choose to hit less-than-driver here to play to the width of the fairway. A very interesting green -- certainly one of the most interesting on the golf course -- tilting severely from back-to-front and with a spine splitting the left and right halves (and note the interesting collection area short of the green)


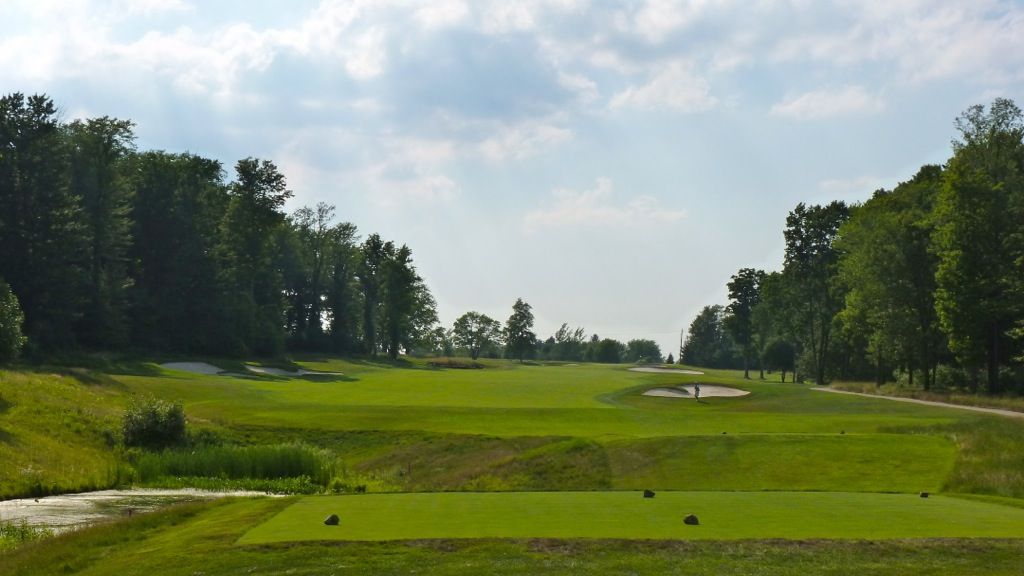
Hole 3: Par 5, 545 Yards -- A rather blah tee shot, but that makes the view when cresting the hill even more impressive! A sea of bunkers left, right and centreline awaits the golfer. What is most interesting is that the one centreline bunker is the only one that adds strategic interest. Looking back from the green the golfer is treated to a Dr. Mack-like bunker disappearing act. Very cool!

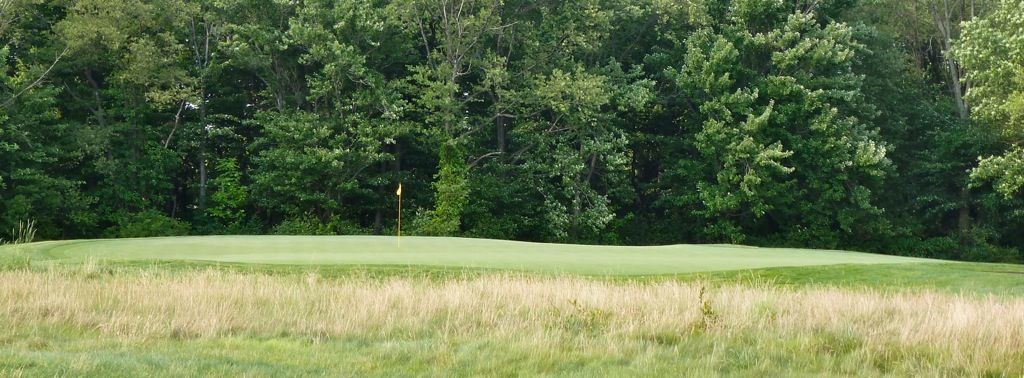
Hole 4: Par 3, 186 Yards -- Pictures tell it all. Green is much larger than it appears from the tee.

Hole 5: Par 4, 407 Yards -- Another bland tee shot but the interest is created on the approach with a Pine Valley-esque double green. The hole is some 30 yards shorter (and the approach simpler) playing to the left green.

Hole 6: Par 5, 485 Yards -- Really one of the weaker holes on the golf course though one of the better greens...
Hole 7: Par 4, 419 Yards -- This hole has in one of a few holes on the course where the back tee is in another country; 50+ yards back and farther to the left, the hole would be extremely difficult from there. From the tees I played the golfer is challenged with carrying the bunker on the left (about 230) but ensuring he does not push his tee shot into the bunkers on the right, which are some of the deepest on the golf course. Nice green site at the bottom of a valley and atop a steep drop off into a ravine.


Hole 8: Par 3, 142 Yards -- A decent short par-3. If nothing else it ticks the box re varying par-3 yardages/looks. Green is actually quite interesting shaped like a boomerang, with a high spot/spine in the centre and a bowl where the pin is located.

Hole 9: Par 4, 374 Yards -- A short par-4 that is less-than-driver for most as the downhill fairway runs into water straightaway (but blind from the tee). Really an awkward tee shot for a first-timer, but the ideal line is just inside the bunker on the right. If the tee shot is placed successfully in the right-side of the fairway, the golfer is left with a wedge to a large two-tiered green that is open in front (and that back tier is tough to find as it slopes away from the golfer, though there is plenty of room to miss long in a collection area).


Hole 10: Par 4, 370 Yards -- A tee shot I am not used to seeing from Mr. Fazio. For a man who is often accused of using too much eye-candy, there is little here to catch one's eye and even less to give an indication of an ideal line. Once cresting the hill the approach is a straightforward one played from a downhill lie over water to a green that slopes towards the golfer.

Hole 11: Par 4, 441 Yards -- One of the most difficult holes on the course, not only is it long (480+ from the back tees) but it has one of the most difficult greens on the golf course. Based on the drawings it seems the inside of the dogleg was intended to be waste area similar to that found left of the fairway but it was not completed that way and I think the small trees placed there instead are an eye-sore. Golfers are tempted to try and cut the corner but only the longest of hitters will find fairway on that line and most will be best-served playing down the left side of the fairway to the leave an ideal line into the green.


Hole 12: Par 3, 150 Yards -- though short on the scorecard, the 12th plays uphill and into the wind and as such will be a mid to long iron for most golfers. The green is separated into three sections, front-left, front-right and back (which slopes away). Precision is demanded here as two-putting from one section to another is a very difficult task.

Hole 13: Par 4, 444 Yards -- The 13th starts the best stretch of holes on the golf course. Played from an elevated tee the ideal tee shot will challenge the bunker on the right, but if you can't get past it don't play toward it as this will leave a blind approach over the bunker. Missing the fairway left leaves a blind (and long) approach over green side bunkering. A deep hollow that is difficult to see from the fairway guards the right side of the green.


Hole 14: Par 5, 511 Yards -- A mid-length par-5 on the scorecard, but it plays much shorter if one takes the direct route to the green (even yours truly was green side in two). A feature I always like on reachable par-5s is a reward for the golfer that chooses to play the hole as a 3-shotter from the tee. That is, the ideal angle of approach if trying to reach in two is from a drive down the right, but the golfer who knows he will playing the hole as a 3-shotter is best served playing his tee shot down the left.

Hole 15: Par 4, 311 Yards -- Even Tommy Naccarato would like this Fazio hole. Excellent use of forced perspective on this short par-4, as the scale and shape of the bunkering, on both sides of the fairway, is perfectly calculated as to make the distance to each set of bunkers nearly impossible to discern. Looking down the right side of the fairway there are actually 3 sets of bunkers, the first of which is only some 150 yards off the tee, there is another 70 yards to reach the second set, and the final bunker is green side. Similarly, down the left, the first set of bunkers is 175 yards from the tee and there are nearly 100 yards between this set and the single bunker past it. The green is also one of the most interesting on the course full of subtle movement, a welcome change from the large, sweeping undulations found on many of the greens at Sand Ridge. The pin pictured is in a particularly interesting spot with a subtle, but effective, run-off behind the pin on a green that slopes generally from back-to-front.

Hole 16: Par 4, 385 Yards -- A nice cape-style hole though perhaps with a miscalculated risk-reward equation to tempt the golfer to cut-off a little more than is advisable. Per my host's recommendation, the smart play is a 3W toward the bunkers on the right, not flirting with the left bunkers. The preferred angle is not from the left. The green is very large, generally tilting from right-to-left. A deep, Raynor-esque back bunker will catch those that bail-out long.


Hole 17: Par 3, 200 Yards -- The tee shot is more intimidating than difficult as this green is massive. Too many slopes and undulations on the 17th green to summarize, but it's a very strong green.

Hole 18: Par 5, 531 Yards -- One of the least interesting tee shots on the golf course, most players will be happy merely avoiding the bunkers on the right. The second shot must avoid a well-placed centreline bunker. Longer hitters can try to carry it and use a feeder slope on the right to reach the green in two. Otherwise, playing left of the centreline to the narrow portion of the fairway will leave a simple pitch into the green, while playing right will leave a longer semi-blind approach over a bunker.

Thanks to these photos, I just played one of a few virtual practice rounds before playing it in two weeks. Thanks for pics and hole explanations.
ReplyDelete